Achieving effortlessly beautiful, natural-looking curls requires understanding the right tools and techniques, whether using heated curlers or heatless methods. The goal is soft waves, bouncy volume, and an undone elegance that mimics the hair’s inherent texture, moving away from rigid, perfect spirals. This guide provides expert insights and product recommendations to help you master natural-looking curls safely and effectively.
What Defines a “Natural” Curl?
When we talk about natural-looking curls, we’re stepping away from the tightly wound, uniform ringlets of yesteryear. Instead, we’re aiming for a softer, more organic aesthetic. Think beachy waves, loose spirals, or voluminous bends that mimic the hair’s inherent texture. The goal is movement, dimension, and a touch of playful imperfection that makes your curls appear genuinely effortless. This style is incredibly popular because it’s flattering on most hair types and lengths, adding body and flair without looking overly styled. For best hair curler roundups on this site.
Decoding Your Tools: Types of Hair Curlers for Natural Waves
Choosing the right tool is the first step toward mastering natural curls. Each type of curler offers unique benefits and produces different results, so understanding them is key to picking your perfect partner in crime.
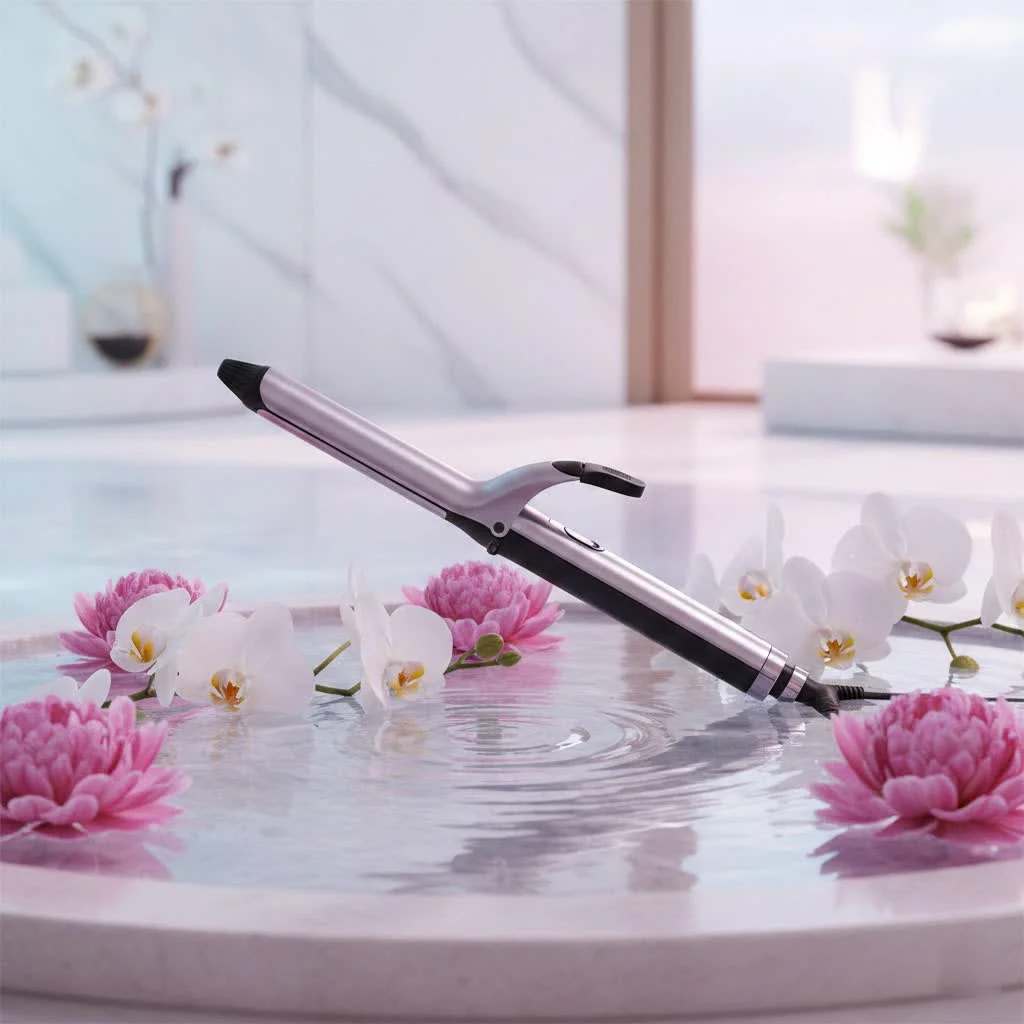
The Classic Curling Iron (with Clamp)
This is likely the most familiar tool in your arsenal. Curling irons with clamps offer excellent control, making them versatile for various curl patterns. For achieving a natural look, focus on technique rather than the tool itself. You can create wide, voluminous curls by keeping sections of hair flat against the barrel without twisting, and to leave the last two inches of hair uncurled for a softer, more natural finish.
The Versatile Curling Wand (Clamp-Free)
Curling wands are a major upgrade for undone, tousled waves. Without a clamp, they offer more freedom, allowing you to wrap hair from root to tip or mid-shaft to ends for varied looks. This clamp-free design often results in more effortless, natural-looking waves and allows for greater versatility in styling. [cite: 1, 3 – search results]
Automatic Curlers
While incredibly convenient, automatic curlers tend to produce more uniform, defined curls. They’re fantastic for speed and consistency, but if your primary goal is a truly “natural” look, you might find other tools offer more nuanced control for that artfully messy finish.
Three-Barrel Wavers & Deep Wavers
If you’re specifically chasing beachy, mermaid, or S-shaped waves, a three-barrel waver or deep waver is your go-to. These tools are designed to create continuous, undulating patterns that perfectly mimic those effortless ocean-kissed locks. [cite: 2, 4 – search results]
Expert Techniques for Effortlessly Natural Curls with Heat
Achieving that “I woke up like this” curl actually involves a few clever techniques. Here’s how my ten years of experience have taught me to get the most natural-looking results with heated tools.
Prep Your Hair Like a Pro
|
Our Picks for the Best Hair Curler in 2026
As an Amazon Associate I earn from qualifying purchases.
|
||
| Num | Product | Action |
|---|---|---|
| 1 | Volumizing Hair Brush, Heat Resistant Curling & Blowout Brush with 17 Anti-Slip Teeth for Smooth, Bouncy Curls - Salon Quality at Home, Gentle on All Hair Types |

|
| 2 | TYMO Automatic Rotating Curling Iron - TYMO CURLPRO Beach Waves Curling Wand, Portable Hair Curler, 500 Million Ionic, Dual Voltage & Lightweight for Travel, Ceramic Coating, 1 Inch, Pink |
|
| 3 | CHI Spin N Curl, Curling Iron For Healthy & Shiny Effortless Curls & Waves, Provides Preset Temperature Settings For Each Hair Texture, Rose Gold |
|
| 4 | Automatic Curling Iron, Auto Hair Curler with 1\" Curling Wand Large Slot & 4 Temperature & 3 Timer, Dual Voltage Anti-Tangle Rotating Curling Iron with Auto Shut-Off for Hair Styling, Champagne |
|
| 5 | Upgraded Automatic Rotating Curling Iron - TYMO CurlPro Plus Long Barrel Curling Wand for Long Hair, Ceramic Hair Curler for Women, Anti-Scald, Tangle-Free, 600M Ionic, Dual Voltage, Gold, 1 Inch |
|
| 6 | Bio Ionic Long Barrel Styler,Curling Iron with Moisture Heat Technology & NanoIonic MX, Verstatile Curling Wand |
|
| 7 | CHIKYO Upgraded 3 Barrel Hair Crimper Waver - 32mm Rovy Wave Curling Iron, 1.25 Inch Ionic Curling Wand, Deep Waver Hair Curler Hot Tool with Ceramic for Women, Dual Voltage, Easy to Use |
|
| 8 | TYMO Automatic Rotating Curling Iron - TYMO CURLPRO Beach Waves Curling Wand, Portable Hair Curler, 500 Million Ionic, Dual Voltage & Lightweight for Travel, Ceramic Coating, 1 Inch, Metallic Gray |
|
| 9 | SHEGLAM Automatic Curling Iron 1 1/4 inch with 3 Temperatures Fast Heating, 2-Way Rotation, Anti-Scald, Anti-Tangle Rotating, Automatic Shut-Off for Hair Styling |
|
| 10 | TYMO Automatic Rotating Curling Iron - TYMO CURLPRO Beach Waves Curling Wand, Portable Hair Curler, 500 Million Ionic, Dual Voltage & Lightweight for Travel, Ceramic Coating, 1 1/4 Inch, Metallic Gray |
|
Preparation is the silent hero of lasting, healthy curls.
- Heat Protectant is Non-Negotiable: This is absolutely vital! Heat protectant spray acts as a shield, sealing in moisture and helping your strands maintain their natural shine and bounce. It safeguards your hair cuticles from potential damage and helps preserve any hair color you have. Always mist your hair with a thermal heat spray from at least 6 inches away before applying heat.
- Completely Dry Hair is a Must: Never, ever use a heat styling tool on wet or damp hair. When your hair is wet, its cuticles are exposed and open, making them highly susceptible to serious damage. Ensure your tresses are completely dry before you even think about grabbing your curler.
- Sectioning for Success: Divide your hair into manageable sections. This makes the curling process easier and ensures every strand gets the attention it needs. Depending on your hair’s thickness and density, you might section by layer or opt for equal sections from one side of your scalp to the other.
Curling for a Natural Vibe
This is where the magic happens. Subtle shifts in your technique can improve your curls from “done” to “dreamy.”
- Barrel Size Matters: For looser, more natural waves, opt for a larger barrel size, typically 1.25 inches or more. If you’re looking to transform loose curls into billowing waves or achieve a more uniform look, a classic 1-inch barrel is ideal. For more volume and bounce, a slightly slimmer 3/4-inch barrel can work wonders, while a 3/8-inch barrel is excellent for defining existing tight curl patterns or creating sky-high coils. [cite: 1, 3 – search results]
- Alternate Directions: To prevent your curls from clumping together and to create a more organic, voluminous look, alternate the direction you curl each section. Curl some sections away from your face and others towards your face. [cite: 1, 4 – search results]
- Leave the Ends Out: This is a simple trick with a huge impact. By not curling the last 1-2 inches of your hair, you create a softer, more undone, and ultimately more natural finish. [cite: 2, 4 – search results]
- Master Your Wrapping Technique:
- Flat Wrap: Keep the hair flat against the curling iron barrel without twisting the section. This technique creates a wide curl with plenty of volume, perfect for finer hair seeking more body.
- Twisted Wrap: For spiral curls, twist the entire section from the base to the ends before wrapping it around the curling iron. This creates a tighter, more textured spiral.
- Temperature Control is Key: You don’t always need the highest heat setting. “Excessive heat will damage the cuticle further,” notes hairstylist Alwyn DiGregorio. “Lower temps with smaller sections will work just as well.” [cite: 1 – search results] A maximum temperature of 392°F is generally recommended to keep hair color safe from dulling and fading. Start with a low-heat setting and gradually increase if needed, allowing for maximum control and minimizing damage.
- Cool Your Curls: Once you release a section, let it cool completely before touching it. You can gently cup the warm curl in your palm for a few seconds as it cools. Cooling helps the curl set and hold its shape longer. [cite: 2, 4 – search results]
The Finishing Touches
A few final steps can make all the difference.
- Loosen Up: Once all your curls are cool, gently run your fingers through them or use a wide-tooth comb to break them up and create that soft, natural movement. Avoid brushing vigorously, which can lead to frizz. [cite: 4, 5 – search results]
- Flexible Hold Hairspray: Finish with a light, flexible-hold hairspray to keep your natural curls in place without making them stiff or crunchy.
- Tame and Shine: A light oil serum can help tame any frizz and add a beautiful, natural shine to your finished look.
Embracing the Heatless Revolution: Natural Curling Without the Heat
Sometimes, the most “natural” hair curler is no heat at all! Heatless curling methods are excellent for protecting your hair from potential damage, especially if you curl frequently, and they offer a convenient way to achieve beautiful waves overnight.
Popular Heatless Methods
The world of heatless curls is diverse, utilizing everything from dedicated tools to everyday household items.
- Robe Belt/Headband Curls: This popular method involves placing a robe belt or a thick, flexible headband over your head and wrapping sections of damp hair around it, securing the ends with scrunchies. Sleep on it, and wake up to soft waves. [cite: 1, 2, 3 – search results]
- Sock Curls: Similar to the robe belt method, clean socks can be used. Part your hair into sections, secure a sock at the top of each section with a clip, and wrap the hair around it. Tie the ends of the sock around your hair to secure. [cite: 3, 4 – search results]
- Braids: For effortless beach waves, simply braid slightly damp hair before bed. Loose braids will give you softer waves, while tighter braids create more defined crimps. [cite: 3, 5 – search results]
- Flexi Rods/Bendy Rods: These foam rods allow you to roll sections of damp hair and bend the rods to secure them close to the scalp. They are fantastic for creating ultra-tight corkscrew curls or defined spirals without heat. [cite: 1, 5 – search results]
- Hair Rollers: Traditional hair rollers, especially larger ones, can create voluminous heatless curls. Roll sections of damp hair around them from ends to scalp and secure with pins. [cite: 3, 4 – search results]
Tips for Heatless Success
- Start with Damp Hair: Most heatless methods work best on hair that is about 70-80% dry, or slightly damp, not soaking wet. This allows the hair to mold to the shape and dry in place. [cite: 1, 2, 4 – search results]
- Product Application: Apply a light mousse or curl cream to damp hair before styling. This helps to define the curls and provide hold once your hair dries. [cite: 5 – search results]
- Allow Ample Setting Time: For most heatless methods, leaving them in overnight provides the best, longest-lasting results. For quicker sets, you might use a fan to speed up the drying process. [cite: 5 – search results]
- Gentle Unveiling: When removing heatless tools, be gentle and slowly unravel your hair to avoid frizz or disrupting the curl pattern.
Choosing Your Perfect Natural Hair Curler
With so many options, how do you pick the “natural hair curler” that’s right for you?
- Consider Your Hair Type:
- Fine or Damaged Hair: Opt for ceramic or tourmaline barrels, which offer gentler, more even heat distribution and help reduce frizz while adding shine. Always choose a curler with adjustable heat settings to use the lowest effective temperature. [cite: 1, 3 – search results]
- Thick Hair: Titanium barrels heat up quickly and maintain temperature well, often preferred for thicker, coarser hair. However, ceramic can also work effectively for even heat. [cite: 1, 5 – search results]
- Naturally Curly Hair: A ceramic curling iron can enhance your natural curl pattern without causing damage. Consider a barrel width closest to your natural curl pattern for touch-ups.
- Hair Length: For shorter hair, a 1-inch barrel is often recommended. For longer hair, a 1.25-inch or even a long-barrel curler can be easier to wrap all your hair around. [cite: 3, 5 – search results]
- Desired Curl Type: Larger barrels (1.25-1.5 inches) create loose waves and voluminous curls, while smaller barrels (0.75-1 inch) create tighter ringlets. Three-barrel wavers are specifically for consistent beach waves. [cite: 1, 3, 4 – search results]
- Material Matters: Ceramic and tourmaline barrels are praised for even heat distribution, reducing damage, and enhancing shine. Titanium heats quickly and is durable. [cite: 1, 2, 3 – search results]
- Essential Features: Look for adjustable heat settings for versatility, a long swivel cord for ease of use, and an automatic shut-off feature for safety. [cite: 1 – search results]
Protecting Your Tresses: Essential Heat Protection Products
Using heat styling tools comes with the responsibility of safeguarding your hair. Heat protection isn’t just a suggestion; it’s a necessity. It’s truly vital for the health of your hair because heat doesn’t just dry hair out; it can destroy the integrity of the inner structure of the hair and even decrease the longevity of any hair color you’ve created.
- Sprays: These are the most common and easiest to apply. Look for lightweight formulas that create a barrier against heat.
- Creams & Serums: These can offer added conditioning benefits, especially for dry or thick hair, while providing heat protection.
- Application Tips: Always apply heat protectant to completely dry hair before heat styling. Ensure even distribution from roots to ends for comprehensive coverage.
Longevity and Care: Maintaining Your Curler and Your Curls
Hair Curler Maintenance
Just like any valuable tool, your hair curler needs a little TLC to perform at its best and last longer.
- Regular Cleaning: Over time, product buildup can accumulate on your curler’s barrel. Allow the tool to cool completely, then gently wipe it down with a damp cloth (and a tiny bit of rubbing alcohol if needed for sticky residue). Ensure it’s completely dry before storing.
- Proper Storage: Store your curler in a heat-resistant pouch or a designated drawer to protect it from dust and accidental damage. Keep the cord neatly wrapped, never tightly wound, to prevent fraying.
Aftercare for Long-Lasting Natural Curls
The work doesn’t stop once you unplug your curler. Proper aftercare ensures your beautiful, natural curls last as long as possible.
- Let Them Cool Down Completely: As mentioned, the cooling phase is crucial for setting the curl. Avoid touching or styling your hair until it’s completely cool.
- Minimal Touching: The more you play with your curls, the faster they’ll fall. Resist the urge to constantly run your hands through your hair.
- Protect Overnight: To refresh coils or waves, you can apply a hydrating mist with ingredients like coconut oil and aloe vera, or a leave-in conditioner. For an extra layer of protection, sleep on a silk pillowcase or tie your hair loosely in a silk scarf to reduce friction and frizz. You can also loosely “pineapple” your hair on top of your head to preserve volume.
Frequently Asked Questions About Natural Hair Curlers
Q: Can I achieve natural curls on fine hair?
A: Absolutely! For fine hair, choose a ceramic curler with adjustable heat settings and use a lower temperature. The flat wrap technique and taking wider sections can create voluminous, natural-looking waves without weighing down your hair. Always use a lightweight heat protectant and a flexible hold hairspray. [cite: 2, 3 – search results]
Q: What’s the best barrel size for beach waves?
A: For classic beach waves, a 1-inch to 1.25-inch curling iron or wand is generally recommended. You can also achieve beach waves with a three-barrel waver for a more consistent, wavy texture. Leaving out the ends and alternating curl directions will enhance the natural, undone look. [cite: 1, 3, 4 – search results]
Q: How do I prevent my curls from falling flat?
A: Several factors contribute to curls holding. Ensure your hair is completely dry before curling. Use a good heat protectant and a low-to-medium heat setting. Allow each curl to cool completely before touching it. Finishing with a flexible hold hairspray and avoiding excessive brushing will help your curls last. For heatless methods, ensure your hair is damp, not wet, and leave the tools in for sufficient time, ideally overnight. [cite: 2, 4, 5 – search results]
Q: Is it safe to curl hair every day?
A: While you can curl your hair daily, it’s crucial to prioritize hair health. Always use heat protectant, keep temperatures as low as possible, and ensure your hair is completely dry. Integrating heatless curling methods into your routine can give your hair a break from daily heat exposure, helping to prevent damage and maintain moisture.
Q: How can I make my heatless curls last longer?
A: For longer-lasting heatless curls, start with slightly damp hair and apply a styling product like mousse or curl cream. Ensure the hair is completely dry before unwrapping the curls. Using a silk pillowcase or scarf overnight will help reduce frizz and preserve the style. You can also use a light hairspray to set the curls once they’re released. [cite: 1, 2, 3, 5 – search results]
Ready to Rock Your Natural Curls?
Achieving beautiful, natural-looking curls, whether with a trusty curling iron or innovative heatless methods, is entirely within your reach. it’s a journey of understanding your hair, mastering techniques, and giving it the care it deserves. Here at Dyesf, we’re committed to providing you with the expert knowledge and practical advice to improve your hair styling routine. So go ahead, experiment, embrace those gorgeous natural waves, and let your hair reflect your effortless beauty. Share your natural curl journey with us – we’d love to see your stunning results!
Frequently Asked Questions
Can I achieve natural curls on fine hair?
Yes, you can achieve natural curls on fine hair by using a ceramic curler with adjustable heat settings at a lower temperature. Employing the flat wrap technique and taking wider sections helps create voluminous, natural-looking waves without weighing down your hair. Always use a lightweight heat protectant and a flexible hold hairspray for best results.
What is the best barrel size for creating beach waves?
For classic beach waves, a 1-inch to 1.25-inch curling iron or wand is generally recommended. You can also use a three-barrel waver for a more consistent, wavy texture. Leaving out the ends of your hair and alternating curl directions will enhance the natural, undone look of beach waves.
How can I prevent my natural curls from falling flat?
To prevent curls from falling flat, ensure your hair is completely dry before curling and use a good heat protectant with a low-to-medium heat setting. Allow each curl to cool completely before touching it, and finish with a flexible hold hairspray. For heatless methods, ensure hair is damp, not wet, and leave tools in overnight.
Is it safe to curl my hair with heat every day?
While daily heat curling is possible, prioritizing hair health is crucial. Always use heat protectant, keep temperatures as low as possible (ideally below 392u00b0F), and ensure hair is completely dry. Integrating heatless curling methods into your routine can give your hair a break from daily heat exposure, helping to prevent damage and maintain moisture.
What are the best tips for making heatless curls last longer?
For longer-lasting heatless curls, start with slightly damp hair (70-80% dry) and apply a styling product like mousse or curl cream. Ensure the hair is completely dry before unwrapping the curls, which often means leaving them in overnight. Using a silk pillowcase or scarf overnight will help reduce frizz and preserve the style, and a light hairspray can set the curls.
Achieve Effortlessly Natural Curls with Heat
Follow these expert steps to create beautiful, natural-looking curls using heated styling tools, ensuring longevity and minimizing damage.
Always apply a heat protectant spray from at least 6 inches away to shield your hair from damage and preserve moisture. Ensure your hair is completely dry before applying any heat, as wet hair is highly susceptible to damage. Divide your hair into manageable sections for easier and more even curling.
For looser, more natural waves, choose a larger barrel size, typically 1.25 inches or more. A 1-inch barrel is ideal for uniform loose curls, while a 3/4-inch barrel adds volume. For tight coils, a 3/8-inch barrel works best.
Alternate the direction you curl each section (away from and towards your face) to create a more organic, voluminous look. Leave the last 1-2 inches of your hair uncurled for a softer, more undone finish. Use a flat wrap for wide curls or a twisted wrap for tighter spirals.
Use the lowest effective heat setting, generally not exceeding 392u00b0F, to prevent damage and fading of hair color. Start low and increase if necessary. Once a section is released, let it cool completely, gently cupping it in your palm for a few seconds to help the curl set and hold its shape longer.
Once all curls are cool, gently run your fingers through them or use a wide-tooth comb to break them up for natural movement, avoiding vigorous brushing to prevent frizz. Finish with a light, flexible-hold hairspray to maintain the style without stiffness. A light oil serum can add shine and tame any flyaways.
Get our weekly buyer guide
Practical specs, not advice. Unsubscribe anytime.
Finally, a guide that gets it! I was tired of my curls looking too ‘done’ and rigid. The advice on mimicking the hair’s inherent texture was a game-changer for me. I invested in one of the ceramic curling wands suggested for loose spirals, and it gives me exactly the undone elegance I was aiming for. My hair feels healthier too!
I’ve always struggled with getting my curls to look natural instead of super stiff. This guide really helped me understand the difference between tight ringlets and those softer, more organic waves. I tried the heatless silk rod method mentioned, and my hair actually looks like I woke up with perfect, bouncy volume. So happy with the results!
This was super helpful for someone like me who wants beachy waves without all the heat damage. I’ve been trying to move away from my curling iron, and the section on heatless methods gave me some great ideas. My hair has never looked so effortlessly elegant, and I love that playful imperfection it talks about. Definitely worth the read!
I appreciate the tips on achieving natural-looking curls, especially the focus on movement and dimension. However, I found that the specific brand of foam rollers recommended didn’t quite work for my thicker hair type. They kept slipping out overnight, which was a bit frustrating. I’ll have to experiment with a different size or material.